


Realtek HD Audio Driver is one of the in large part used sound drivers that helps you to control the sound settings for Windows. Realtek HD Audio Manager comes with in-constructed Realtek audio motive force. This sound motive force has such a lot of treasured capabilities and additionally helps a six-channel Digital to Analog Converter (DAC) with 16.20.24-bit Pulse Code Modulation in channel audio of 5.1.
Along with supplying a remarkable sound in your device with the assist of the audio card, the sound motive force additionally handles the sound manage play at the Windows. To enhance the sound, you want to attach it together along with your audio device.
There may be a state of affairs whilst you face problems in getting access to the sound motive force or while the Realtek audio supervisor icon has long past lacking from the taskbar, device tray or notifications section.
The hassle can also additionally begin bobbing up if you have carried out the Windows replace or if there’s a alternate withinside the audio card motive force.
To troubleshoot the hassle, first, you should understand wherein to discover the Realtek HD Audio Manager
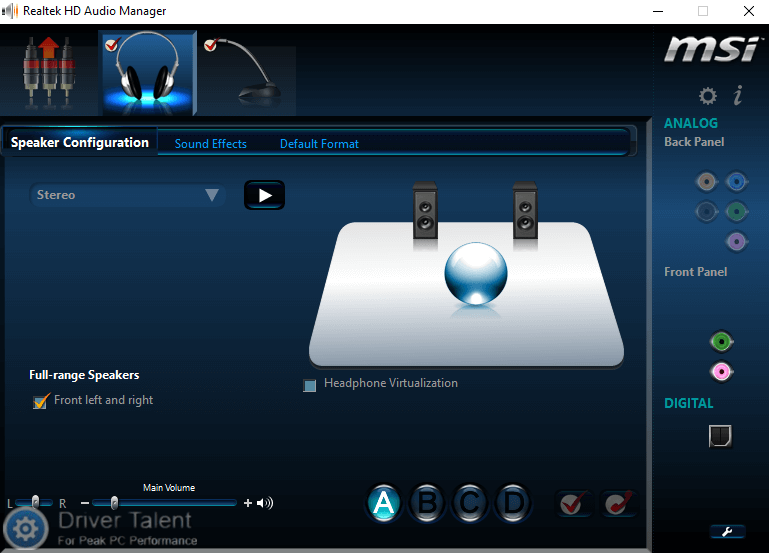
Where to Look for Realtek Hd Audio Manager?
Realtek HD Audio Manager is usually hooked up collectively with Realtek HD Audio Driver. If you’ve got got already hooked up the Audio motive force, you could probably discover the Realtek HD Audio Manager from the Control Panel.
In case, you aren’t capable of discover Realtek HD Audio Manager in Control Panel, comply with the guidelines given below:
- Go to the C drive of your device, open Program Files, click on Realtek, and then open Audio folder
- In the HDA folder, double-click on RtkNGUI64.exe and doing this will open Realktek HD audio manager.
If you still failed at finding Realtek HD audio manager, you may need to reinstall it after updating Realtek HD Audio driver.
Reinstalling Realtek Hd Audio Manager
To reinstall Realtek HD Audio Manager, you will be required to update the audio drivers first but before that uninstall the outdated ones.
Uninstalling the Drivers
Begin with uninstalling all the existing drivers as to avoid getting duplicate drivers downloaded and to do this follow the instructions given below-
- Click on Start menu button and go to the Device Manager.
- You will see a list there and you have to expand Sound, video and game controllers.
- Look for the audio driver Realtek High Definition Audio.
- Right-click on it and from the drop-down menu, select ‘Uninstall’ option.
- Tick mark the option ‘Delete the driver software for this device’ and click on ‘Uninstall’.
- Open Views tab and click on ‘Show hidden devices’ from the drop-down menu.
- Now check if there are any duplicate drivers. If yes, right-click on it and press the Uninstall button. After that, restart the system.
Download and Re-install the Realtek Hd Audio Manager
After uninstalling, now you can update the audio drivers, follow these instructions:
- Go to the Realtek website in a browser.
- Find the right drivers for your device and download them manually. Once you have downloaded the file, you can run the file and follow the instructions to install the update.
Troubleshooting Realtek Hd Audio Manager
Even after updating the Realtek HD Audio driver, if the problem is still there, you can follow the given troubleshooting tips:
Disable Microsoft Uaa Bus Driver
-
-
- Go to the Device Manager and expand the System Devices.
- Look for Microsoft UAA Bus Driver for HD Audio.
- Right-click on it and from the drop-down, click on ‘Disable’.
- Go to ‘Windows Settings’ and then click on ‘Apps and Features’.
- Click on ‘Realtek High Definition Audio Driver’ and then click on ‘Uninstall the driver’.
-
-
-
- Then go to Device Manager and right-click on the disabled driver.
- From the drop-down menu, click on ‘Uninstall’.
- Now, you can reinstall the Realtek HD Audio Driver.
-
Enable the Startup
-
-
- Using the ‘Start’ menu, open the Task Manager.
- Then go to the Startup tab and look for Realtek HD Audio Manager.
- If the status is showing as ‘Disabled’, right-click on it and click Enable from the drop-down menu and then restart the system.
-
Update the Sound Driver Software
-
-
- Go to Device Manager and click on (+) to expand Sound, video and game controllers.
- Right-click on Realtek High Definition Audio and from the menu, click on Update driver option.
-
-
-
- If you have the latest driver setup file on your system, choose ‘Browse my computer’ under driver software.
-
-
-
- Click on the option ‘Let me pick from a list of available drivers on my computer’.
- Look for the latest driver by date and then click on ‘Next’ to update.
-
Add Legacy Hardware
-
-
- Go to Device Manager and click on (+) to expand Sound, video and game controllers.
- Click on the ‘Action’ tab, search and click on ‘Add legacy hardware’ from the menu.
-
-
-
- Click on ‘Next’ and select the radio button that says ‘Search for and install the hardware automatically’.
-
-
- Click on Next and then install the driver again.
That’s how you can download and reinstall Realtek HD audio manager windows 10.