


With the Prevalence of the Comcast.net email platform, it is important to know how to configure it on a different platform. With Comcast, you can access all available email programs available on the web. Xfinity email account is quite complicated to be set up with SMTP and IMAP email settings. You must know how you need to configure the Xfinity Comcast e-mail account through pop and imap settings. Pop is the oldest protocol for access to internet messages, and also a reliable way to set up your email account. However, the IMAP Comcast setting ensures convenient email use on several devices.
To set up your Comcast’s SMTP, you must first have the correct configuration for your Comcast email.
Delivery settings and receiving e-mail when using email comast.net are as follows:
- Incoming Mail Server Name: imap.comcast.net
- Incoming Mail Server Port Number:
- Recommended: 993 with SSL ON
- Only if Needed: 143 with SSL ON
- Outgoing Mail Server Name: smtp.comcast.net
- Outgoing Mail Server Port Number:
- Recommended: 587 (SMTP)
- Only if Needed: 465 (SMTPS)
- SSL Encryption: checked
- Authentication: Xfinity or Comcast username and password required
By only setting the POP settings, you could not open your emails on multiple devices, and for this; you need to set up the IMAP settings, as it will allow you to organize your emails on multiple devices.
However, we are here discussing both POP and IMAP settings and hence providing you the ways to set up both the settings on different platforms, you just need to follow the instructions given below:
Set up Xfinity Email Settings on Windows 10:
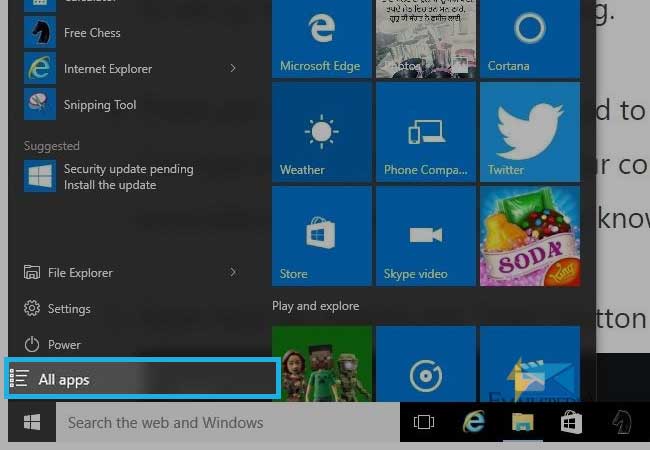
1.First, you need to click on the “All Apps” option from the Start menu.
2.Now from there, you need to select “mail”
3.You will be then, prompted to the Welcome screen (if you don’t have anything added before)
4.Click on “Add account”. But if you have already added an account before, you need to click on the Settings icon from the left corner of the screen.
5.On opening the Settings menu, select Accounts and then +Add account.
6.Scroll down below on the “choose an account” screen and then Advanced setup.
7.On the Advanced Setup, select the second option of Internet Email
8.Now, you will be prompted to set a number of settings. Firstly, you will be asked to add the Account Name- that can be anything of your choice such as “my Xfinity email”. Next, you need to provide the email-name that will appear on the “send from” field. You can fill the first and end name.
-
- Now, in the “Incoming email server” field you need to enter: imap.comcast.net and then from the “Account Type” drop-down menu you need to choose IMAP4.
- Now, in the User name menu, you need to provide the Comcast username that you used while creating your email account. For example, if your id is: abc@comcast.com, your username will be “abc”. Then, type your password.
- In the “Outgoing (SMTP) email server” option, you need to enter: smtp.comast.net
- Next, you need to check all the boxes you see on the next screen. And, then click the Sign-in button.
- Click Done and then Comcast email is set on your Windows 10.
Configure Outlook Settings for Comcast email:
- Open Outlook on your device
- Now, click on Tools and then Accounts
- Click on the “+” icon from the bottom-left corner and then select New Account
- Now provide your Comcast email address in the respective field and click Continue
- Click on the field says IMAP
- Now, you need to enter the Username and then Password for your Comcast account. Click on “Show password”
- You need to provide the “imap.comcast.net” in the Incoming Server field and smtp.comcast.net in the Outgoing Server field.
- Make sure the incoming Port has 993 and the outgoing Port has 465.
- Now check the boxes say Use SSL to connect (recommended)
- Click on Add Account.
- Now, tap on Add Another Account and add another account and then click Done.
- And, it’s done
Configure Comcast Email settings for Gmail:
In case, you are looking to configure Comcast for Gmail, give it a try underneath the given steps.
1.Go to your Gmail login page and enter into your account by entering the correct set of login id and password
2.Click on the cogwheel Icon place on the top-right corner of the page. It will move you to the Settings menu.
3.Click on the “Account & Import” tab.
4.From there click on the Add “POP3 Email Account”
5.A pop window will appear with Email address box
6.Add Your Comcast Email Address here and Click on the “Next” option
7.From the next screen set up your account password and other settings as well as the mail server and select 995 port. Select the “Always use a secure connection (SSL) when retrieving mail” box
8.Now Hit the “Add Account” button.
9.Select if you want to send an email from your Comcast account to Gmail and click on “Next.”
10.Pick a display name.
11.Check the “Treat as an Alias” box. If you don’t check it, the mail you send will show in your inbox as well as your sent folder. When, you are done, hit on “Next.”
12.Select if you want to send your emails from Gmail or Comcast server.
13.Now enter your Comcast password one more time and click on Add Account.
14.A code will be sent to your Comcast email account to verify your account. Now, Log into your Comcast Email Account and click on the link to verify the Gmail account and you are done.